Monday 27 May 2013


Mozilla Firefox shortcut keys

Below is a listing of all the major shortcut keys in Mozilla Firefox. See the computer shortcut page if you are looking for other shortcut keys used in other programs.
Shortcut Keys Description
Alt + Home Open your home page.
Alt + Left Arrow Back a page.
Alt + Right Arrow Forward a page.
F5 Refresh current page, frame, or tab.
F11 Display the current website in full screen mode. Pressing F11 again will exit this mode.
Esc Stop page or download from loading.
Ctrl + (- or +) Increase or decrease the font size, pressing '-' will decrease and '+' will increase. Ctrl + 0 will reset back to default.
Ctrl + Enter Quickly complete an address. For example, type computerhope in the address bar and press CTRL + ENTER to get http://www.computerhope.com.
Ctrl + Shift + Del Open the Clear Data window to quickly clear private data.
Ctrl + D Add a bookmark for the page currently opened.
Ctrl + I Display available bookmarks.
Ctrl + J Display the download window.
Ctrl + K or Ctrl + E Move the cursor to the search box.
Ctrl + N Open New browser window.
Ctrl + P Print current page or frame.
Ctrl + T Opens a new tab.
Ctrl + F4 or Ctrl + W Closes the currently selected tab.
Ctrl + Shift + T Undo the close of a window.
Ctrl + Tab Moves through each of the open tabs.
Spacebar Moves down a page at a time.
Shift + Spacebar Moves up a page at a time.
Alt + Down arrow Display all previous text entered in a text box and available options on drop down menu.

Blender 3D Hotkeys, Shortcut Keys and Reference

OM = Object Mode only SM = Sculpt Mode only
EM = Edit Mode only PM = Pose Mode only

A
Select all / Deselect all
Shift + A
Add menu
Alt + A
Play animation toggle
Alt + Shift + A
Play animation in reverse toggle
CTRL + A
OM
Apply menu (such as freeze transforms)
CTRL + Shift + A
OM
Make Dupliverts Real
 
B
Border select (marquee select)
Shift + B
Marquee zoom
Shift + B
Set render border (Active Camera)
Alt + B
Isolate 3D view toggle
 
C
 
Circle select (brush select)
C
SM
Clay brush
Shift + C
3D Cursor to origin
Alt + C
OM
Convert menu
Alt + C
EM
Close / Open a curve
CTRL + Shift + C
OM
Add Constraint menu
CTRL + Alt + Shift + C
Set Origin menu
 
D
SM
Draw brush
Shift + D
Duplicate
Alt + D
Linked Duplicate (Instance)
 
E
EM
Extrude region
Alt + E
EM
Extrude menu
Shift + E
EM
Crease
Shift + E
EM
Set Keyframe Extrapolation menu (Graph Editor)
E
End frame assign (Timeline window)
CTRL + E
EM
Edges menu
 
F
EM
Create Face (3+ vertices selected)
F
EM
Create Edge (2 vertices selected)
F
SM
Brush size adjust
Shift + F
SM
Brush strength adjust
Shift + F
Camera Fly mode
CTRL + F
EM
Faces menu
Alt + F
EM
Fill create faces
Alt + Shift + F
EM
Beauty Fill create faces
CTRL + Shift + F
EM
Edge Flip
CTRL + Alt + Shift + F
EM
Select linked flat faces (Face Mode only)
 
G
Move (Grab)
G
SM
Grab brush
Alt + G
OM
Reset location
CTRL + G
Create new group
Shift + G
OM
Select Grouped menu
CTRL + Shift + G
OM
Add selected to active group
Alt + Shift + G
OM
Remove selected from active group
Alt + G
Ungroup (Node Editor)
CTRL + G
EM
Vertex Groups menu
Shift + G
EM
Select Similar menu
CTRL + G
Add selected objects to group
 
H
Hide selected
Shift + H
Hide unselected
Alt + H
Unhide all
CTRL + H
OM
Restrict selected from render
CTRL + Alt + H
OM
Allow selected to render
H
Minimize node toggle (Node window)
CTRL + H
EM
Hooks menu
 
I
Insert Keyframe menu
Alt + I
Delete keyframe
I
SM
Inflate brush
CTRL + I
Select Inverse
Shift + I
PM
Add IK menu
CTRL + Alt + I
PM
Remove IK constraint
 
J
Save last render (Render window)
CTRL + J
OM
Join selected objects
Alt + J
EM
Covert selected triangles to Quads
 
LMB + K
EM
Knife cut
LMB + Shift + K
EM
Knife cut midpoint
 
L
OM
Make Local menu
L
EM
Select Linked Components
L
SM
Layer brush
CTRL + L
OM
Make Links menu
Shift + L
OM
Select Linked menu
 
M
OM
Move object to a different layer
M
Add Marker (Action Editor)
M
Add Marker (Timeline)
CTRL + M
Mirror object over an axis
Alt + M
EM
Merge menu
 
N
Properties panel toggle
CTRL + N
OM
Reload Start-up File
CTRL + N
PM
Recalculate Roll menu
CTRL + N
EM
Recalculate normals to outside
CTRL + Shift + N
EM
Recalculate normals to inside
 
O
EM
Proportional Editing on/off toggle
Alt + O
EM
Proportional Editing connected toggle
Shift + O
EM
Proportional Editing Falloff type toggle
CTRL + O
Open file
CTRL + Alt + O
Link file
O
Clean Keyframes (F-Curve Editor)
Alt + O
Smooth Keys (F-Curve Editor)
Alt + O
OM
Clear Origin on children
 
P
OM
Start Game Engine
P
EM
Separate
P
SM
Pinch/Magnify brush
P
EM
Pin vertices (UV/Image Editor)
Alt + P
EM
Unpin vertices (UV/Image Editor)
Alt + P
Clear Parent menu
CTRL + P
Make Parent
CTRL + Shift + P
Make Parent without Inverse
CTRL + P
EM
Make Vertex Parent
CTRL + Alt + P
Make Proxy
 
CTRL + Q
Quit Blender
CTRL + Alt + Q
Quad View toggle
 
R
Rotate
Alt + R
OM
Clear rotation
CTRL + R
EM
Loop Cut
Shift + R
EM
Select Row from selected vertex (NURBS surface)
 
S
Scale
Alt + S
OM
Reset Scale
S
SM
Smooth brush
S
Start frame assign (Timeline window)
Shift + S
Snap menu
Alt + S
EM
Shrink / Fatten
CTRL + S
Save File
 
T
Object Tools panel toggle
T
Toggle frames / seconds (Timeline)
CTRL + T
EM
Tilt (Curves)
Alt + T
EM
Reset Tilt (Curves)
Shift + T
SM
Flatten/Contrast brush
Shift + T
Move Texture Space
Shift + Alt + T
Scale Texture Space
CTRL + T
OM
Make Track menu
Alt + T
OM
Clear Track menu
CTRL + T
EM
Convert selected faces to triangles
 
U
OM
Make Single User menu
U
EM
UV Mapping menu
CTRL + U
Save User Settings
CTRL + Alt + U
User Preferences window
 
V
EM
Set Handle Type menu (curves)
V
EM
Rip selected vertices
V
Object Mode / Vertex Paint Mode toggle
CTRL + V
EM
Vertices menu
 
W
OM
Specials menu
W
EM
Specials menu (varies per object)
W
EM
Weld / Align menu (UV/Image Editor)
Shift + W
EM
Warp
CTRL + W
Save File
 
X
Delete menu
X
Constrain global X axis transform
XX
Constrain local X axis transform
 
Y
Constrain global Y axis transform
YY
Constrain local Y axis transform
Y
EM
Split Vertex / Edge / Face
 
Z
Constrain global Z axis transform
ZZ
Constrain local Z axis transform
Z
Solid / Wireframe toggle
Alt + Z
Solid / Textured toggle
CTRL + Z
Undo
CTRL + Shift + Z
Redo
 
NUM 0
Active camera view
CTRL + NUM 0
Turn selected object into active camera
CTRL + Alt + NUM 0
Move camera to current view
NUM .
Frame selected in view
NUM /
Global/Local view toggle
NUM 1
Front view
NUM 3
Side view
NUM 7
Top view
NUM 5
Perspective/Orthographic view toggle
CTRL + NUM 1
Back view
CTRL + NUM 3
Other side view
CTRL + NUM 7
Bottom view
NUM 4/NUM 6
Rotate view left/right in iterations
NUM 2/NUM 8
Rotate view up/down in iterations
 
Keyboard #
View layer 1 - 10
Alt + Keyboard #
View layer 11 - 20
~
View all layers
CTRL + Keyboard #
Add Subsurf modifier with that # of levels
 
,
Bounding Box Center pivot
CTRL + ,
Median Point pivot
.
3D Cursor pivot
CTRL + .
Individual Centers pivot
Alt + .
Active Object pivot
 
HOME
Frame all in view
Tab
Object Mode / Edit Mode toggle
CTRL + Tab
EM
Mesh Select Mode menu
CTRL + Tab
OM
Object Mode / Weight Paint Mode toggle
CTRL + Tab
Object Mode / Pose Mode toggle (Armatures)
Spacebar
Search (3D view)
Spacebar
Toolbox (UV/Image Editor)
CTRL + Spacebar
Transform Manipulator toggle
Alt + Spacebar
Orientation menu
CTRL + LMB drag
Lasso select
CTRL + LMB click
EM
Extrude / Create new component or bone
Left/Right Arrow
Increase 1 frame
Up/Down Arrow
Increase 10 frames
Shift + Left/Right Arrow
Go to end start/end frame
CTRL + Up/Down Arrows
Maximize current view toggle
Shift + Spacebar
Maximize current view toggle
CTRL + Left/Right Arrows
Screen presets toggle
 
F1
Open file
F2
Save As
F3
Repeat History menu
F3
Save Rendered Image (UV/Image Editor)
F11
Show last closed rendered image
F12
Render current frame
CTRL + F12
Render animation
 
Shift + F1
Link/Append from Library
Shift + F2
Logic Editor
Shift + F3
Node Editor
Shift + F4
Python Console
Shift + F5
3D view
Shift + F6
Graph Editor
Shift + F7
Properties
Shift + F8
Video Sequence Editor
Shift + F9
Outliner
Shift + F10
UV/Image Editor
Shift + F11
Text Editor
Shift + F12
Dope Sheet

Blender 3D useful shortcut keys

Where is the "..." key in Blender? The following is a list of useful keyboard shortcut keys, commands and features that you'll find handy when using Blender 3D to model content for use in either Blenders own 'Blender Game Engine' or external third party game engines; it's worth getting to know them as they'll allow you to get the most out of the 3D application when modeling content for games.

Keyboard hotkey & shortcut charts ^

A keyboard 'map' is helpful given how many shortcut and hotkey combinations there are in Blender. The following hotkey chart shows the basic shortcuts available for Blender. A blank version is also provided for 'custom' key mappings and mappings that differ based on system language.
Basic 'standard' (UK) hotkey keyboard layout map for Blender Basic ('standard' UK) keyboard layout and hotkey map for Blender - N.B. some shortcut keys may be mapped differently depending on system language
Blender hotkey keyboard shortcut map blank so you can chart your own key-combinations Blender keyboard shortcut & hotkey map blank so you can chart your own key-combinations - standard keyboard layout based on UK language

Navigation shortcut keys ^

Items marked [*] are compatible with the latest versions Blender.
  • G = MOVE [*]
    G then 'X', 'Y' or 'Z' = MOVE along specific axis only.
  • S = RESIZE [*]
    S then 'X', 'Y' or 'Z' = RESIZE along specific axis only.
  • R = ROTATE [*]
    R then 'X', 'Y' or 'Z' = ROTATE along specific axis only.
  • X = DELETE [*]
    Displays the delete 'options' pop up.
  • M = LAYERS [*]
    Displays the 'move to layer' pop up - selected object will be moved to the selected layer. Displays current layer as selected on opening.
  • NumPad 1, 3, 7 and 5 [*]
    View port control; 'front', 'side', 'top' and 'perspective' respectively. Pressing any of these will put the view port the mouse has control over (the mouse is placed over) into 'orthogonal' or 'perspective' mode.
  • Shift + F1-F12 = Window 'Type'

    • F1 - File Browser; F2 - Logic Editor; F3 - Node Editor; F4 - Console; F5 - 3D View; F6 - Graph Editor; F7 - Properties; F8 - Video Sequence Editor; F9 - Outliner; F10 - UV/Image Editor; F11 - Text Editor; F12 - Dope Sheet. [*]
    • F1 - File Browser (load); F2 - File Browser (export); F3 - Node Editor; F4 - Data Select; F 5 - 3D View; F 6 - IPO Curve Editor; F7 - Buttons; F8 - Video Sequence Editor; F9 - Outliner; F10 - UV/Image Editor; F11 - Text Editor; F12 - Action Editor.
  • Middle Mouse Button (MMB)
    • MMB Click Hold
      By default moves the view port the mouse has control over based on mouse position. Can be altered to use different rotation focus points.
    • MMB Scroll Up/Down [*]
      Zooms the view port forwards/backwards.
    • MMB+Shift [*]
      'Translates' the view port, moves view left/right and up/down.
    • MMB+Ctrl [*]
      Zooms view port Uses a finer distance control than scrolling MMB.
  • Left Mouse Button (LMB)
    • LMB Click [*]
      'Sets' an action. After moving or doing something LMB Click is used to 'set' the action in place. For example, a moved object stays placed relative to it's position when you click the left mouse button during a 'move' action.
  • Right Mouse Button (RMB) [*]
    • RMB Click [*]
      Selects object or item.
    • RMB+Shift [*]
      Selects multiple objects or items.

Mode switch shortcuts ^

  • TAB = EDIT mode (including UVEdit mode) [*]
  • V = VERTEX PAINT mode [*]
  • F = UVW mode (TAB in 2.46 & above)
  • Ctrl+TAB = FACE SELECT TYPE - Edit mode [*]
    In edit mode allows the selecting of faces by polygon, edge or vertex 'groups'. Allows working on a mesh in different modes, facilitating slightly different working methods.

Function shortcut keys ^

  • A = SELECT/DESELECT [*]
    Mode sensitive - will select/deselect items based on which mode you're in.
  • E = EXTRUDE [*]
    Mode sensitive - will extrude polygons, vertices or edges either individually (so the create their own 'children', or as a group.
  • U = UVWunwrap
    UVWmode only (for later versions, including 2.5, UVW editing is done in Edit mode).
  • Ctrl+R = LOOPCUT [*]
    Cuts a 'loop' - a line that follows the contours of a model.
  • B = BORDER/Loop SELECT [*]
    Pressing 'B' once activates the 'grid' border select tool. Pressing again activates the selector 'brush' that allows 'paint selecting' objects. Useful for selecting multiple faces or vertices in edit mode.
    • Alt+B = Loop Select 'Cut/Show' [*]
      Using Alt+B toggles on/off the loop 'cut' feature whereby Blender will show only the areas of a scene or object inside the selection loop drawn on screen. Alt+B toggles this feature on/off so the rest of the scene is unhidden when the shortcut is used again.
    • Shift+B = Select Zoom [*]
      View zooms into selected areas
  • F = Create FACE/EDGE [*]
    Creates a polygon ('quad' or triangle') depending on 'select type' - vertexes, edges or faces.
    • Ctrl+Shift+F = Edge FLIP [*]
      Flips orientation of corned-to-corner edges. Selected polygons should be triangles.
  • Shift+D/Alt+D = Duplicate [*]
    Depending on the Editor (viewport) using the standard "Ctrl+C" to "Copy" and "Ctrl+V" to "Paste" may not work, in the main 3DView for example "Shift+D" creates a 'duplicate' of an original source as an independent Object; "Alt+D" similarly 'duplicates' originating Objects but retains a dynamic link to the source, which if edited propagates changes in real time to the duplicate. In both instances Object properties and settings are duplicated.

Installing Blender *.py scripts ^

Before any custom scripts can be used they have to be placed into a special folder, once there Blender sees the files and pulls them in for use, depending on their function. For pre-2.50 versions of Blender (2.49 or below) this folder is called "scripts", post 2.50 (2.50 or above), "addons". On Windows based computers these are 'system' folders and hidden from view to protect them for general access, so they have to be made visible before scripts can be placed.

To unhide system folders using Windows XP;

Click the "Start" button then select "All Programs » Accessories » Windows Explorer" to open Windows Explorer. Here, click "Tools » Folder Options..." then on the "View" tab of the dialogue that opens. In the "Advanced Settings" panel, make sure "Show hidden files and folders" is selected (click the radial button). Optionally, deselect "Hide extensions for known files types" - this helps to identity identical files by extension, rather than name (for example a file listed twice as "sample" will actually be "sample.py" and "sample.exe"). Click "Apply" then "OK".

To unhide system folders using Windows Vista/Windows 7;

Click "Start" then "All Programs » Accessories » Windows Explorer" to open Windows Explorer, click "Organize" (upper-left) and select "Folder and search options" from the list of menu options. In the properties dialogue which opens, click "View", then from the "Advanced settings:" section find and deselect (clear the checkbox/radial buttons) "Show Hidden files and folders" and "Hide protected operating system files". Click "Apply" then "OK".
Once hidden files and folders have been made visible the "scripts" and/or "addons" folder can be tracked down (see below).

Blender 'scripts' folder in Windows Vista/Windows 7 ^

For Windows Vista/Windows 7 based machines the 'scripts' and/or 'addons' folder is located in a "Users" profile, typically for Blender 2.49 or below (note: "[profile name]" is a users 'log-in profile name', "mom", "pete", "my computer" etc.);
C:\Users\[profile name]\AppData\Roaming\Blender Foundation\Blender\.blender\scripts
If it's not there, try looking for the following;
C:\ProgramData\Blender Foundation\Blender\.blender\scripts
For Blender 2.50 or above, the path to "addons" is usually;
C:\Users\[profile name]\AppData\Roaming\Blender Foundation\Blender\.blender\scripts\addons
If it's not there, try looking for the following;
C:\ProgramData\Blender Foundation\Blender\.blender\scripts\addons
If more than one version of Blender is installed, the location will vary depending on how each was set up, using a numerical sequence per version might mean a path similar to "..\Blender\2.49\scripts\", ...\Blender\2.60\scripts\addons" and so on for example.
Once the folder has been located, simply copy/paste the script into the appropriate folder (or as per-instructed by the script). Upon opening Blender the function provided should then be available.
Note: if the scripts folder still can't be found, use Windows Search feature ("Window key + F") to look for any "Blender Foundation" folders, "scripts" is usually a sub-folder within.

Blender 'scripts' folder in Windows XP ^

For Windows XP based systems the 'scripts' and/or 'addons' folder is located in the "Documents and Settings" folder, typically (note: "[user]" is a users log-in 'profile name', e.g. "mom", "pete", "my computer" etc.);
C:\Documents and Settings\[user]\Application Data\Blender Foundation\Blender\scripts
The 'addons' folder will be located typically in;
C:\Documents and Settings\[user]\Application Data\Blender Foundation\Blender\scripts\addons
Again, if more than one version of Blender is installed, the location will vary depending on how each was set up, using a numerical sequence per version might mean a path similar to "..\Blender\2.49\scripts\", ...\Blender\2.60\scripts\addons" and so on for example.
Once the folder has been located, simply copy/paste the script into the appropriate folder (or as per-instructed by the script). Upon opening Blender the function provided should then be available.
Note: if the scripts folder still can't be found, use Windows Search feature ("Window key + F") to look for any "Blender Foundation" folders, "scripts" is usually a sub-folder within.
10 Most Commonly Used Keyboard Shortcuts in Illustrator

Posted on July 26, 2008 | Category :Tutorials & Tips | 1 Comment
Since everyone loves lists. Here is a list of 10 of my favorite keyboard shortcuts in Adobe Illustrator. Your list may be different than mine, so feel free to add a comment about your favorite shortcut. Before I start, I just wanted to say that I left off copy, paste, save, open and tool changes. They just seemed too obvious.
Paste in Front (Command/Control F)
Paste in Front is a great way to make a copy of an object in the exact same place. I mostly use this in conjunction with the Pathfinder Tools for creating my shadow and highlight shapes.
Send to Back (Command/Control + Shift [)
I use Send to Back more than any of the other Arrange commands. Again, I use this in conjunction with the Pathfinder Tools. Most of the time, I’ll send a shape to the back, before I merge or divide it with another. This keeps all my shapes in the right place.
Group (Command/Control G) and Ungroup (Command/Control + Shift G)
OK, so I cheated. This is two shortcuts, but they are related. I use group and ungroup in the normal ways (to group shapes), but I also use them to move shapes around. If you group a shape that is in back to one that is in the front, the one in the back will move right underneath the one in the front. Also, grouping shapes on different layers will move them to the same layer.
Lock Selection (Command/Control 2)
I don’t really work in layers, so I’ll often Lock and Unlock shapes to make it easier to select other shapes.
Transform Again (Command/Control D)
Transform Again is a good way to repeat the last copy that you did. It’s a quick way to create evenly spaced shapes.
Copy Drag (Option + Shift while dragging a shape)
Holding Option down while you drag a shape is the simplest way to copy a shape. When you hold down the Shift key too, then the object will only move horizontally or vertically.
Smart Guides (Command/Control U)
Smart Guides are very useful for aligning shapes. I also find them really annoying to look at, so I toggle them on and off a lot.
Select All (Command/Control A)
Sometimes, I want to select everything on the page. It’s a good way to check if you have any stray shapes on the paste board, locked objects or unoutlined fonts.
Add or Subtract to a Selection (Shift Click)
Holding Shift and clicking allows you to select multiple shapes. It also allows you to deselect shapes.
Fit in Window (Command/Control 0)
If you are like me, then you are constantly zooming in and out. I’ll zoom in all the way to select a point on the line and then zoom out, so I can see the big picture. When I do this, I find that Fit in Window is a quick way to zoom out.
Well, that’s my list. feel free to add your own favorites below

Hot Keys for CS2 and CS3

General Shortcuts


Ctrl + S = Save
Ctrl + O = Open
Ctrl + P = Print
Ctrl + C = Copy
Ctrl + X = Cut
Ctrl + V = Paste
Ctrl + N = New Document
Ctrl + '+' = Zoom In
Ctrl + '+' = Zoom Out
Ctrl + Q = Terminate program
Ctrl + W = Closes window (document you're working on)
Ctrl + R = Opens up rulers on the screen for measurement
Ctrl + A = Select All
Ctrl + D = Deselect
Ctrl + Z = Undo once (press again it will re-do)
Ctrl + Alt + Z = Undo (press again it will undo)
Ctrl + Alt + F = Feather
F = Change view of screen
Alt + Shift + Ctrl + K = Change Keyboard Shortcuts


Tools Shortcuts

Q = Quickmask mode (press again to turn off)
W= Wand tool
E = Eraser
R = Smudge Tool
T = Type/Text tool
Y = History brush tool
U = Shape Tool
I = Eyedropper / colour selector tool
O = Dodge / Burn tool
P = Pen tool
A = Path selection tool
S = Clone stamp tool
G = Fill tool
H = Hand tool
J = Red eye tool
K = Slice tool
L = Lasso tool
Z = Magnifier / Zoom tool
C = Crop tool
V = Move tool
B = Brush tool
N = Notes tool
M = Marquee tool

Color Shortcuts

Ctrl + Y = Change document to CMYK
Ctrl + B = Change Colour Balance
Ctrl + M = Change Curves
Ctrl + I = Invert Selection
Ctrl + U = Change Hue/Saturation
Ctrl + L = Change Levels
D = Change foreground colour to black on pallete
X = Switches foreground & background colours on pallete


Layer Shortcuts

Ctrl + Shift + N = New Layer
Ctrl + E = Merge Selected layer down
Ctrl + Shift + E = Merge all layers
Ctrl + J = Duplicate Layer
Ctrl + G = Create new layer group
Ctrl + Alt + G = Create Clipping Mask
Alt + = Select bottom layer
Alt + = Select Top layer


Shape Shortcuts

Ctrl + T = Transform

there is a couple more that i use often..

Shift + any tool's letter to select the next tool of that type

Ctrl + num 0 [on the num pad] to resize to fit
Ctrl + Alt + num 0 to resize to screensize [100%]
Tab to hide all the pallets

Ctrl + shift + S to save as
Ctrl + alt + shift + S to save as for the web

ctrl + alt + shift + E to merge all layers into a new layer.. make sure u have a visible layer selected

Ctrl + F to reapply the last filter
Ctrl + alt + F to reopen the last filter so u can change the settings

Alt + backspace to fill with foreground color
Ctrl + backspace to fill with background color
Shift + backspace to open the fill options

also i have custom hotkeys set that some of u might find useful like
Ctrl + Alt + G for Gaussian blur
Ctrl + Alt + C for clouds
Ctrl + Alt + W to flip horizontally
Ctrl + Alt + E to flip vertically
Ctrl + Alt + R to use the wrap tool
^those wont work if u don't set them manually 

Photoshop Secret Shortcuts


It is proven that by using software shortcuts can boost up productivity. Here are 30 secret Photoshop shortcuts that I've learned from years of experience. Well, what I mean by "secret" is that these shortcuts are not documented in the menus. Keep reading and you will find how these shortcuts can speed up your productivity. I bet you don't know all of them.
Note: this article is written in Mac Photoshop format. If you are using PC, Cmd = Ctrl and Opt = Alt.
  1. Drag selection
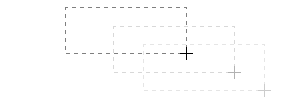
    With the Marquee tool, drag on the document (do not release the mouse yet), now hold down Spacebar, it will let you drag the undefined selection.
    screenshot
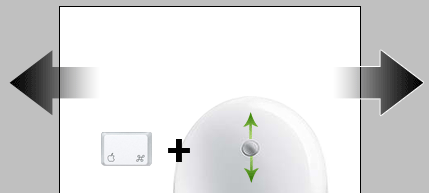
  2. Navigate the document left or right
    Hold down the Cmd key and scroll up or down allows you to navigate the document left or right. For example, hold down Cmd + scroll up will navigate to right.
    screenshot
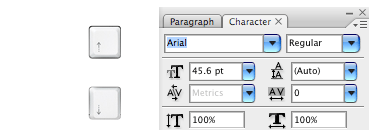
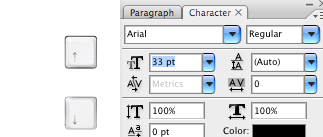
  3. Browse the font list
    Put your cursor in the font list dropdown, you can browse the font list by pressing arrow Up or Down key.
    screenshot
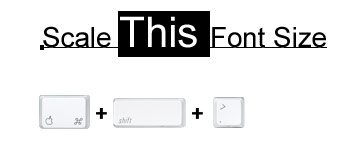
  4. Scale font size
    Select the text that you want to scale the font size, press Cmd + Shift + > or < to increase / decrease font size.
    screenshot
  5. Zoom with the scroll wheel
    You can zoom in / out by Cmd + Opt + scroll up or down.
    screenshot
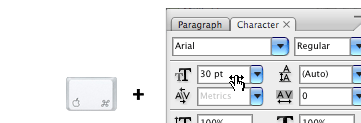
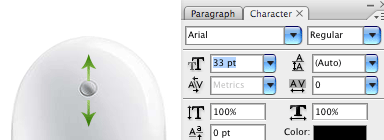
  6. Drag to adjust numberic value
    Mouseover the input box, hold down Cmd + drag left or right to increase / decrease. Hold down Cmd + Opt or Shift key and drag can change the value in decimal or 10 interval. This shortcut works in all dialog palettes.
    screenshot
  7. Scroll to adjust numeric value
    Put the cursor in the input box, scroll up or down to increase / decrease value. This shortcut works in all dialog palettes.
    screenshot
  8. Arrow up / down to adjust numeric value
    Put the cursor in the input box, press arrow Up or Down to increase / decrease. Hold down Shift and press arrow Up or Down will change value in 10 interval.
    screenshot
  9. Zoom to 100%
    Double click on the Zoom tool will zoom document to 100%.
    screenshot
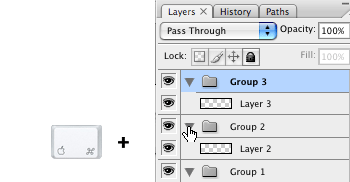
  10. Collapse or expand all layer groups
    You can collapse or expand all root-level layer groups by holding down Cmd + click on the triangle icon. Hold down Cmd + Opt + click on the triangle icon will collapse or expand all level layer groups.
    screenshot
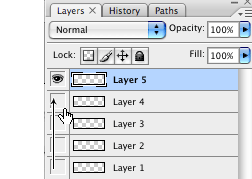
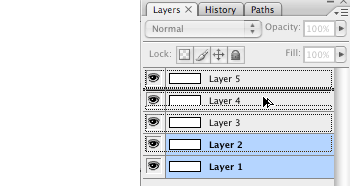
  11. Show / hide in a row
    If you need to show / hide more than one layers, instead of clicking one by one, you can click on the visibility icon and drag in a row.
    screenshot
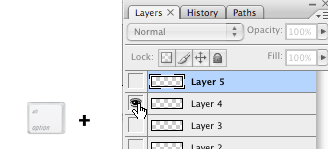
  12. Hide other layers
    Hold down Opt + click on the visibility icon will hide all other layers.
    screenshot
  13. Navigate layer blending mode
    Opt + Shift + "-" or "+" key allows you to navigate through the blending mode dropdown.
    screenshot
  14. Set specific blending mode
    Opt + Shift + C, N, M, S, D... allows to set layer to specific blending mode.
    For examples:
    Normal = Opt + Shift + N
    Screen = Opt + Shift + S
    Multiply = Opt + Shift + M
    Color = Opt + Shift + C
    screenshot
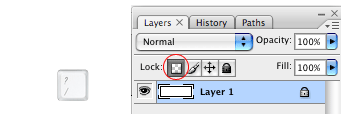
  15. Lock layer transparency
    Press forward slash ("/") to lock layer transparency.
    screenshot
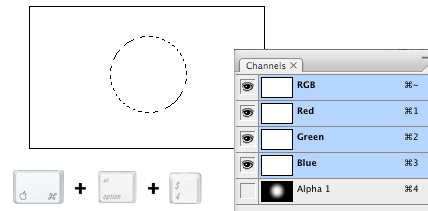
  16. Load Channel selection
    You probably know that Cmd + number keys (1, 2, 3) will activate the channels in sequent. Press Cmd + Opt + number keys will load the selection. For example, press Cmd + Opt + 4 will load Alpha channel 1.
    screenshot
  17. Tool panels
    Press Tab to toggle tool panels.
    screenshot
  18. Precise cursor
    Caps lock will display tool cursor in precise mode.
    screenshot
  19. Navigate the tool list
    You can navigate through the tool list by pressing Shift + tool shorcut. For example: B = Brush tool, if you press Shift + B again, you will switch to Pencil tool.
    screenshot
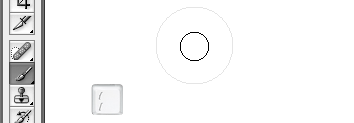
  20. Increase / decrease brush size
    With the Brush tool selected, you can increase / decrease the brush size by pressing [ or ] key (square bracket key). Press Shift + [ or ] will increase / decrease brush hardness.
    screenshot
  21. Opacity
    You can set the layer opacity by pressing the number keys (ie. 1 = 10%, 2 = 20%...). When you have the brush tool selected, pressing the number keys will adjust the brush opacity.
    screenshot
  22. Duplicate layer
    There are several shortcuts to duplicate layers.
    1. You can hold down Cmd + Opt + drag to duplicate the active layer.
    2. Cmd + Opt + arrow keys (Up, Down, Left, Right).
    3. Cmd + J will duplicate the active layer in exact position.
    4. Hold down Opt + drag within the Layers palette can also duplicate layers.
    screenshot
  23. Copy visible and paste in a new layer
    Press Cmd + Opt + Shift + E will copy the visible layers and paste in a new layer.
    screenshot
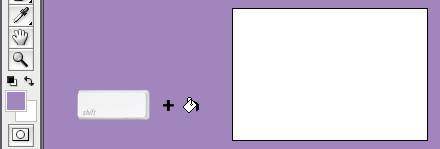
  24. Change workspace background
    By default Photoshop use grey for the workspace background color. You can change that by:
    1. select your favorite color
    2. choose the Paint Bucket tool
    3. Hold down Shift + click on the working area (outside the document area)
    screenshot
    Update: right-click on the workspace area to get a dropdown menu - allows you to set the background to black, grey, or a custom color (commented by Todd Patrick).
  25. Fill background or foreground color
    Opt + Delete (Backspace) = fill the layer with foreground color.
    Cmd + Delete (Backspace) = fill the layer with background color
    screenshot
    Update:
    Cmd + Shift + Delete (Backspace) = Fill non-transparent pixels with background color Opt + Shift + Delete (Backspace) = Fill non-transparent pixels with foreground color
    (commented by André Dion)
  26. Switch between document windows
    Ctrl + Tab will switch between document windows.
    screenshot
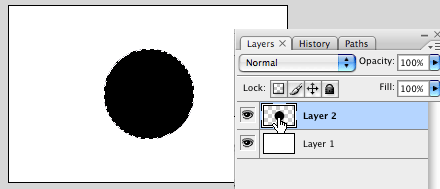
  27. Load layer transparent
    Cmd + click on the layer thumbnail will load its transparency.
    screenshot
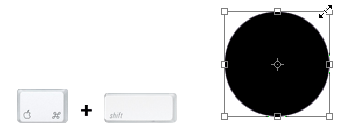
  28. Scale proportionally from center
    When you are using the Marquee tools or Free Transform, hold down Opt + Shift + drag will scale proportionally from the center.
    screenshot
  29. Shortcut to Eyedropper
    If you have the Brush tool selected, hold down Opt key will quickly activate the Eyedropper tool. Hold down Opt + Shift will activate the Color Sampler Tool.
    screenshot
  30. Finally...
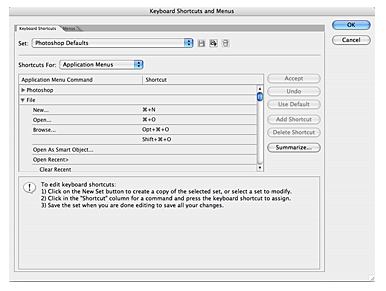
    Finally, if you want to check or set your own custom shortcuts, press Cmd + Opt + Shift + K will bring up the Keyboard Shortcuts panel.
    screenshot

Keyboard Shortcuts for Photoshop Toolbox


At a Glance

photoshop tool box shortcut

61 Toolbox Keyboard Shortcuts

  • + – Add Shape
  • - – Subtract Shape
  • / – Preserve Transparency (toggle)
  • [ - Decrease Brush Size
  • ] – Increase Brush Size
  • Shift+ [ - Decrease Brush Softness by 25%
  • Shift+ ] – Increase Brush Hardness by 25%
  • < – Previous Brush
  • > – Next Brush
  • Shift+ < – First Brush
  • Shift+ > – >Last Brush
  • 10 – Tool Opacity 10% → 100%
  • Shift+10 – Flow / Airbrush Opacity 10% → 100%
  • A – Path / Direct Selection Tool
  • B – Brush / Pencil / Color Replacement Tool
  • C – Crop Tool
  • D – Default Colors
  • E – Eraser Tool
  • F – Cycle Screen Modes
  • G – Gradient / Paint Bucket Tool
  • H – Hand Tool
  • I – Eyedropper / Sampler / Measure Tool
  • J – Spot Healing / Healing / Patch / Red Eye
  • K – Slice Tool
  • L – Lasso Tool
  • M – Marquee Tool
  • N – Notes / Audio Annotation Tool
  • O – Dodge / Burn / Sponge Tool
  • P – Pen / Freeform Pen Tool
  • Q – Standard / Quick Mask Mode
  • R – Blur / Sharpen / Smudge Tool
  • S – Clone / Pattern Stamp Tool
  • T – Type Tool (Vertical / Horizontal)
  • U – Shape Tool
  • V – Move Tool
  • W – Magic Wand Tool
  • X – Switch Colors
  • Y – History / Art History Brush Tool
  • Z – Zoom Tool
  • Space – >Hand Tool (toggle)
  • Ctrl+Space -Zoom In (toggle)
  • Alt+Space – Zoom Out (toggle)
  • Shift+A – Cycle Path / Direct Selection Tools
  • Shift+B – Cycle Brush / Pencil / Color Replacement
  • Shift+E – Cycle Eraser Tools
  • Shift+F – Menubar (show / hide)
  • Shift+G – Toggle Gradient / Paint Bucket Tools
  • Shift+ I – Cycle Eyedropper / Sampler / Measure
  • Shift+J – Cycle Spot / Healing / Patch / Red Eye
  • Shift+K – Toggle Slice / Slice Select Tools
  • Shift+L – Cycle Lasso Tools
  • Shift+M – Toggle Rectangular / Elliptical Marquee
  • Shift+N – Toggle Notes / Audio Annotation Tools
  • Shift+O – Cycle Dodge / Burn / Sponge Tools
  • Shift+P – Toggle Pen / Freeform Pen Tools
  • Shift+R – Cycle Blur / Sharpen / Smudge Tools
  • Shift+S – Toggle Clone / Pattern Stamp Tools
  • Shift+T – Cycle Type Tools (Vertical / Horizontal)
  • Shift+U – Cycle Shape / Line Tools
  • Shift+Y – Toggle History / Art History Brush
  • Alt+Shift+P – Airbrush (Brush Tool)